


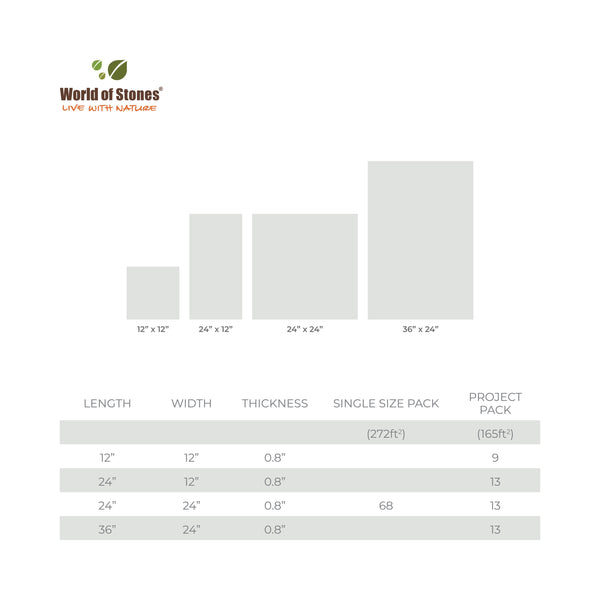
Size Chart
- Travertine Porcelain, as its name suggests, it is available in Travertine-like beige shades and Travertine stone tones. You may find the perfect simulation of Travertine stone in terms of color, texture, and pattern.
- Travertine shade offers an eye-soothing and relaxing experience when you are enjoying natural beauty outside of your home or your office areas like on a patio or terrace.
- CeraPave brings the best of Porcelain characteristics. It is sturdy & weatherproof, as well as having very low water absorption. It makes it less susceptible to staining and easy to clean.
- The slightly textured surface also gives CeraPave products good slip resistance.
- It is available in four-size project packs to bring creativity by variations in patterns and styles.
CeraPave is a Paving Inventory at World of Stones USA that contains different shades with unique properties & characteristics.
Edge Finish: Rectified
| Standard Laying Pattern | Repeatable Laying Pattern |
 |
 |
Porcelain Paving Laying Guideline

Installation Guide for Porcelain Paving
- CHECK YOUR PRODUCT
Ensure that you check your product before laying – we recommend dry laying a random selection of your slabs (from more than one pallet where applicable) to ensure that you are satisfied with the colour variation in the slabs. Claims or returns based on colour variation will not be accepted once the product has been laid. Ensure that whilst working with outdoor paving slabs that they are rested on wooden battens to prevent any edge chipping.
- PREPARE YOUR BASE
Prior to installation, all necessary ground work should be completed. This includes ensuring there is a sub-base of at least 50 – 100mm thick of type 1 material (hard-core) which has been sufficiently compacted down, with a suitable water drainage fall (a fall of 1:60 is usually adequate).
- PRIME YOUR SLABS
- Apply a Slurry Primer mixed using cement powder, water and an outdoor based SBR bonding agent to a creamy consistency to the back of each slab before it is laid to help the paving adhere to the bed.
- Paving slabs may need to be handled by 2 people (in particular the larger sized slabs). When applying slurry primer, ensure that you rest the slab on wooden battens to prevent any chipping.
- Before applying the slurry primer, using a stiff brush, brush the back of the slab to clean off the magnesium oxide releasing agents, this will create the bond of the slurry primer to the Cerapave Porcelain paving. Paint each slab with slurry primer as you lay them, not all at once before you begin laying. The slurry primer on the back of the slab must still be wet when it is laid down, therefore you should not prime all slabs first before you start laying. This will ensure that the slab adheres to the mortar bed correctly. If any slurry primer is on the face-up side of the slab, immediately wash away the residue with water as you work.
- USE A FULL BED OF MORTAR
Just like natural stone products, World of Stones USA Cerapave Porcelain paving must be laid on a full wet bed of mortar. We recommend a mixture of a moist consistency (rather than runny) with approx. 4:1 sharp sand to cement.
Please remember that with all World of Stones USA products – the spot laying method is not suitable!
- LAY YOUR SLABS
It is essential that each slab is tapped down to ensure as much of the slab as possible comes into contact with the mortar. When laying your project, ensure that you mix slabs to achieve an overall blended appearance. While the finishes of Cerapave Porcelain paving have less surface variation than natural stone, they are still designed with a level of variation to add a range of texture to their surface. If within the selection of slabs you encounter any repeat patterns, we suggest that you rotate slabs 90/180 degrees in order to minimise the appearance of repetition (this may be more prevalent in slabs which have a more extensive surface pattern).
-
CUTTING CERAPAVEPORCELAIN PAVING
Cerapave Porcelain paving can be cut with a disc cutter fitted with a suitable-for-porcelain paving diamond blade (this must be a petrol disc cutter as you must feed the disc with water to cut). However, for neater and more accurate cutting, we recommend using a suitable water-fed slab bridge saw. Ensure that appropriate protective clothing is worn while operating machinery.
- CHECK YOUR JOINTS
Allow for 10-12mm+/- approx joints when laying the slabs. We suggest an outdoor jointing compound (suitable for porcelain paving) should be used with our Cerapave Porcelain paving products – please speak to your merchant or landscaper for the most appropriate jointing compound for your project. As stated, World of Stones USA Cerapave Porcelain paving products are not designed to be butt jointed.
- IMPORTANT – CLEANTHE JOB
It is particularly important to work cleanly when laying Cerapave Porcelain paving, both during and after installation. Once the job is completed, additional cleaning may be required if any residue remains, particularly from jointing compounds. Ensure that the jointing compound has set sufficiently and then clean the slabs with a suitable residue remover (depending upon which jointing compound has been used). Any residue left over from the laying process must be removed as soon as possible – failure to do so may result in staining on the surface of the slabs. If your Cerapave Porcelain paving has been laid in conjunction with any natural stone, ensure that the porcelain paving cleaner/residue remover you are using does not contain any acid and check they are suitable for porcelain paving.